Getting Started with OpenPO
OpenPO Workspace and Sidebar
Workspace Overview
Everything you and your team do in OpenPO happens in the workspace. You and your team can expand, edit, and shape it to meet the team's needs.
Workspace Basics
The OpenPO product interface is divided into two areas:the sidebar and the editing area.
Sidebar
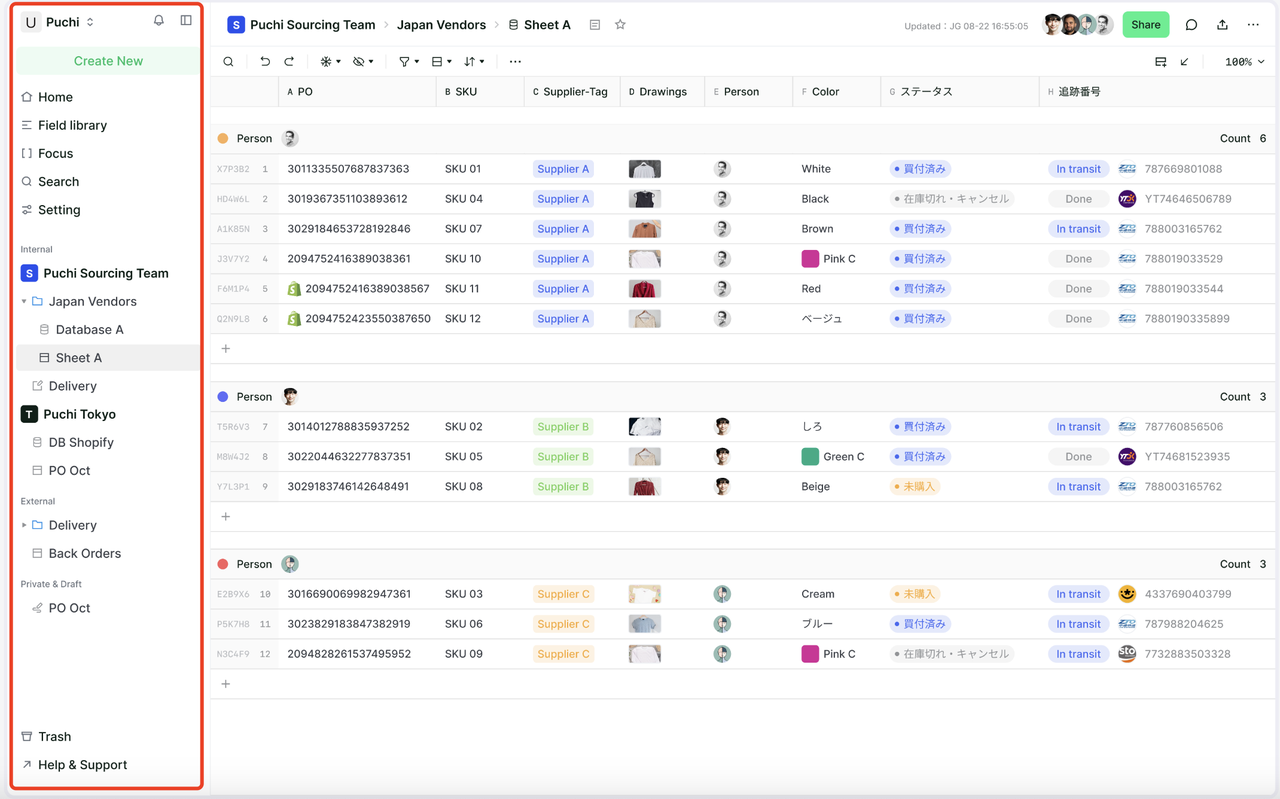
The OpenPO sidebar is your navigation system.
- All teamspaces and resourcesyou create will appear here.
- The sidebar contains multiple sections that you can reorder and customize.
- Supports searching for all resources in the workspace.
- Manage account and workspace settings.
Editing Area
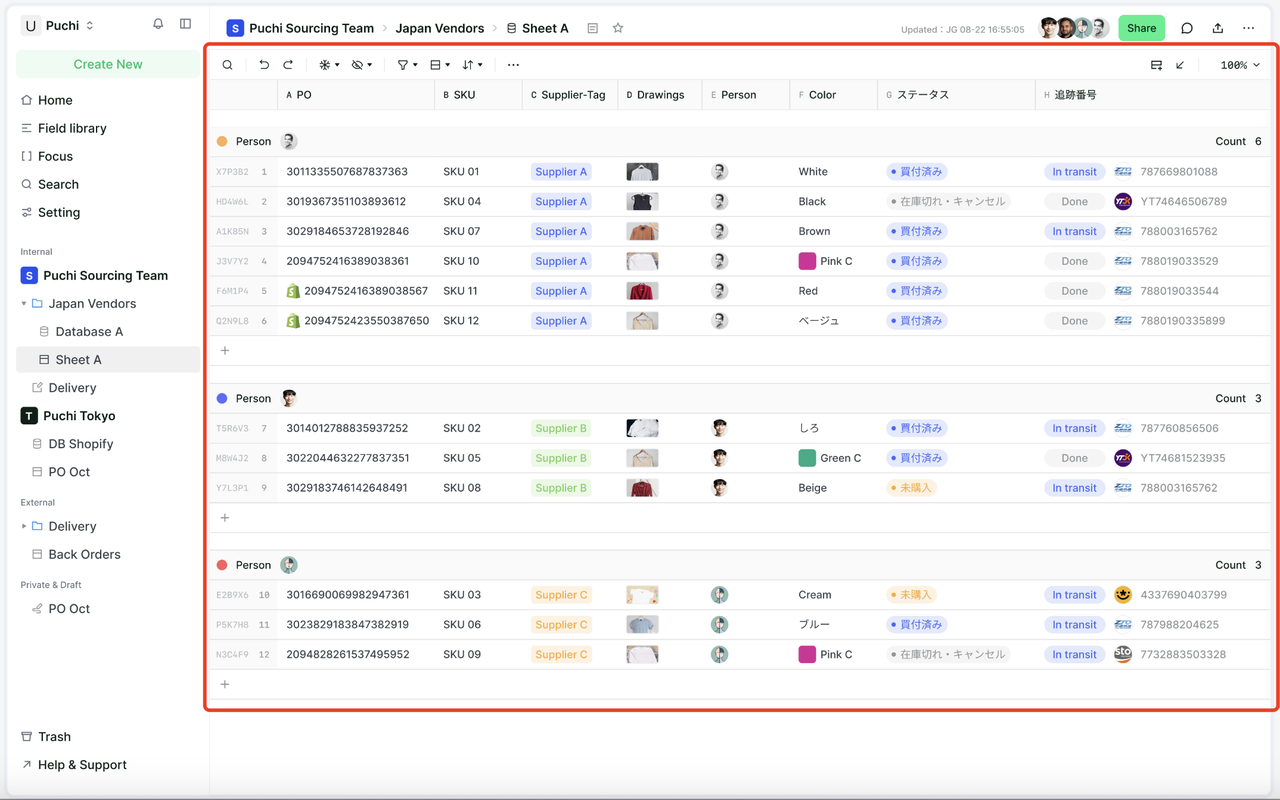
This is the editing area for all your resources.
Sidebar Introduction
Control Panel
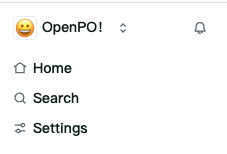
The control panel at the top of the sidebar includes several key functions:
- Workspace Switcher: Click the name of your current workspace to switch between the workspaces you belong to, create a new workspace, join another workspace, or log out.
- Home: Click to view resource cards and task cards that require your attention, and support editing the cards and their positions on the home page.
- Search: Click to open the OpenPO search window, where you can enter the content you want to find and quickly jump to the corresponding resource.
- Settings: Includes settings for this workspace and your personal profile.
Workspace supports modifications: workspace name and icon, language, delete workspace.
Personal profile supports modifications: username and avatar, account password, email address.
- Inbox: Click to view all notifications in your current workspace. When you have unread notifications, a red notification reminder will be displayed here.
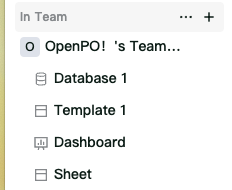
Sidebar Sections
Your sidebar contains multiple sections to keep the workspace content organized:
- In Team: Used to manage different teams or departments within the workspace.
- Cross Team: This section includes resources that are currently shared with you individually in the workspace.
- Private & Draft: Users can edit table data in draft mode, ensuring all information is accurate before uploading and synchronizing with other team members.
You can rearrange and customize the sidebar sections.
Tip:
Click on the section name - Teamspaces, Shared, Private, to collapse it, keeping your sidebar neat and clean.
Mouse Hover Options
When you hover over a team space or folder in the sidebar, you will see a "+" button for creating a nested resource within it.
And an editing icon "…" for the page, click to open the corresponding operation menu.Hovering over a Teamspace:
“+” button: New Team Space
“...” editing button: Browse all team spaces
Hovering over any teamspace: 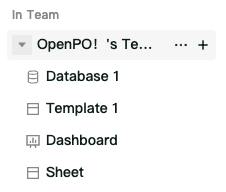
“+” button: New Resource, New Folder, Import Spreadsheet
“...” editing button: Add Members, Team Space Settings, Leave Team Space, Delete Team Space.
Hovering over a folder: 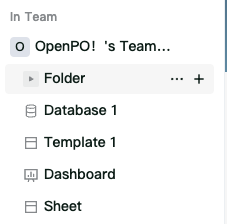
“+” button: New Resource, New Folder, Import Spreadsheet
“...” editing button: Rename, Move, Delete, Drafts, Open in New Tab.
Hovering over a resource: 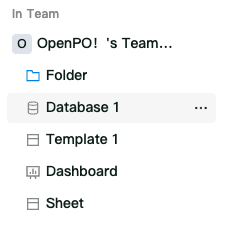
“...” editing button: Rename, Move, Delete, Drafts, Open in New Tab.
Editing Area Introduction
Top Navigation Bar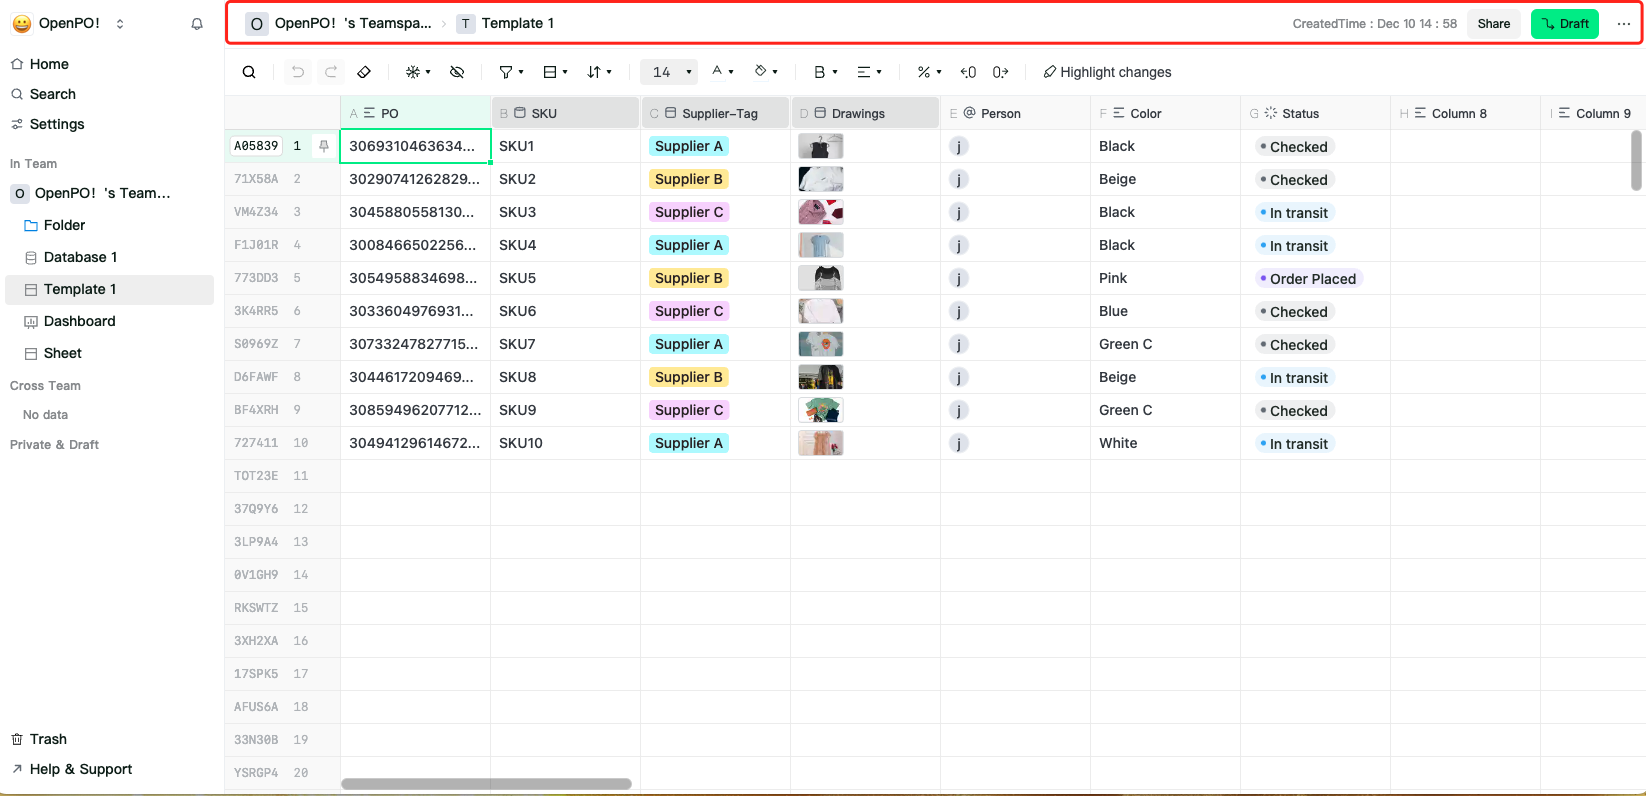
- Breadcrumbs
Always know your position in the current resource structure. View the current resource hierarchy, and you can click on any page in the breadcrumbs to jump to it immediately. Sometimes, when there are too many levels, it is displayed as "…", click to view all intermediate resources.
- Online Members
You can see the avatars of all others who can access the current resource, and when you hover over the avatar, you can see the full name and email address corresponding to it.
- Resource Sharing
You can view the corresponding permissions for different roles in the resource and invite individual users in the resource.
Users with full permissions support sharing resources with other users and configuring permissions in the sharing popup.
In table resources, you can configure advanced permissions to achieve permission control focused on each cell.
- Draft Mode (Table Resources Only)
Draft mode provides a safe, flexible, and efficient environment to help users make multiple modifications and optimizations during data processing, ensuring the quality and accuracy of the content.
Members can edit table data in draft mode, ensuring all information is accurate before uploading and synchronizing with other team members.
You can click to create a draft of the table, and the created draft will appear in the Private area of the sidebar.
For a single user, only one draft is supported for a single resource.
- Log Management (Table Resources Only)

You can click the "…" button in the top navigation bar of the table, and find the "Log Management" option in the pop-up menu.
Click "Log Management", and a right-side configuration popup will appear.
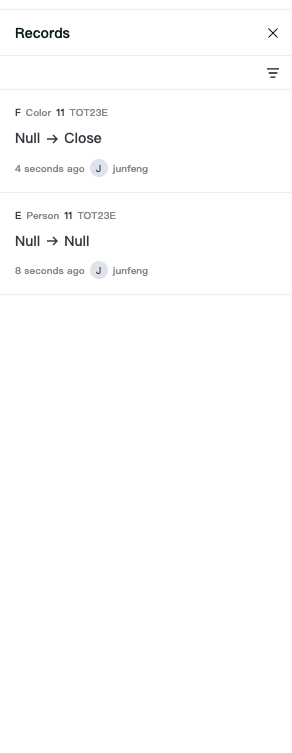
You can view the change history of specific rows, columns, and cells, including the operator and operation time. At the same time, you can also query the change records of any rows, columns, or cells you are interested in through filter conditions.
- Historical Versions (Table Resources Only)
Operation Steps:
You can click the "…" button in the top navigation bar of the table, and find the "Historical Versions" option in the pop-up menu.
Click the "Version Comparison" option, and a right-side configuration popup will appear.
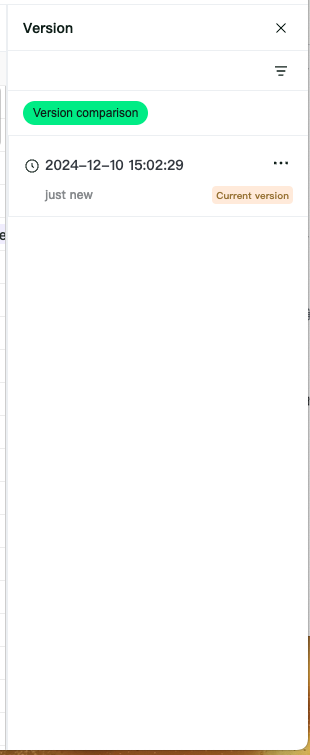
Historical Version Records
OpenPO records the historical versions of the resource, and names them by default according to the recording time.
You can click the "…" button after any version to name that version.
Filtering
You can click the filter button to filter out named versions or unnamed versions.
Version Comparison
Operation Steps:
Click the version comparison button to enter the version comparison page. 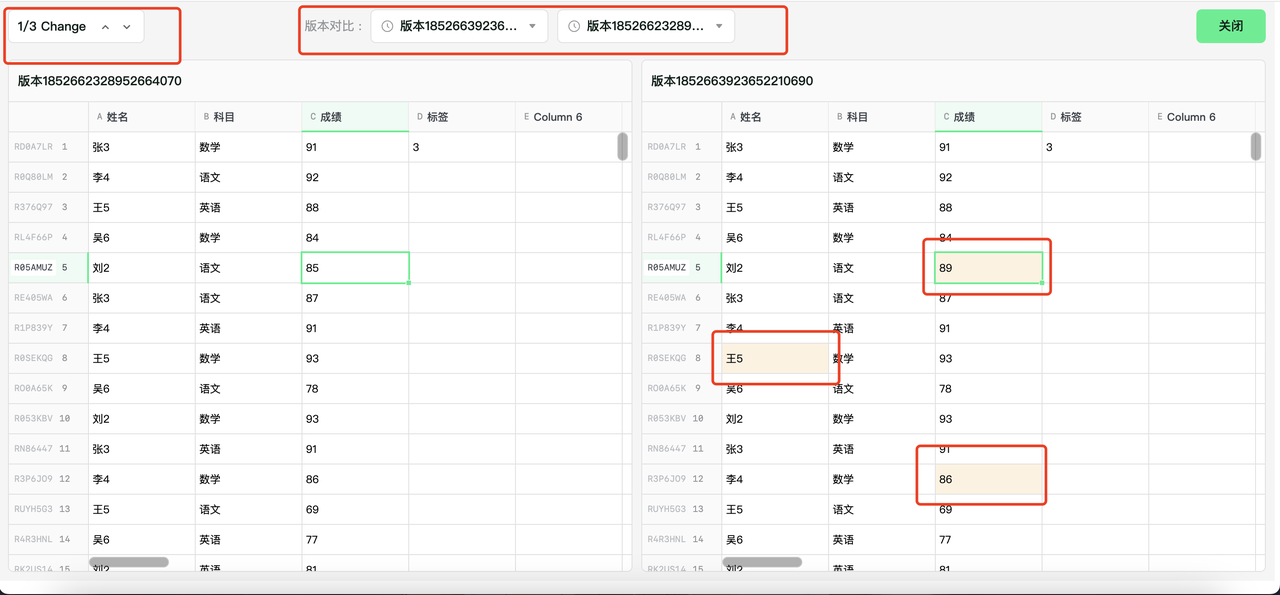
Support for selecting two versions to compare in the top operation bar of the version comparison page, and the page will compare the two versions.
- Cells that have changed in the table are highlighted for display.
- After comparison, the number of changed cells in the two versions is displayed on the left side of the top operation bar, and you can click the arrow to switch the currently selected cell.
OpenPO Resource Introduction
Resources in OpenPO all exist under teamspaces.
Resources in OpenPO include:
- Sheet
- Database
- Dashboard
- Folder
Creating resources: Users with full access can create resources by clicking the "+" button in folders or team spaces and selecting the resource type to create.
Note:
Excel files can be imported.
Folder Overview
Folders are used to store resources and help users categorize and organize resources.
- Supports containing other folders to form a hierarchy.
- Supports permission settings to control access and operation permissions of resources in the folder for different users or roles.
- OpenPO provides a search function, allowing users to quickly find folders containing specific resources or meeting specific conditions.
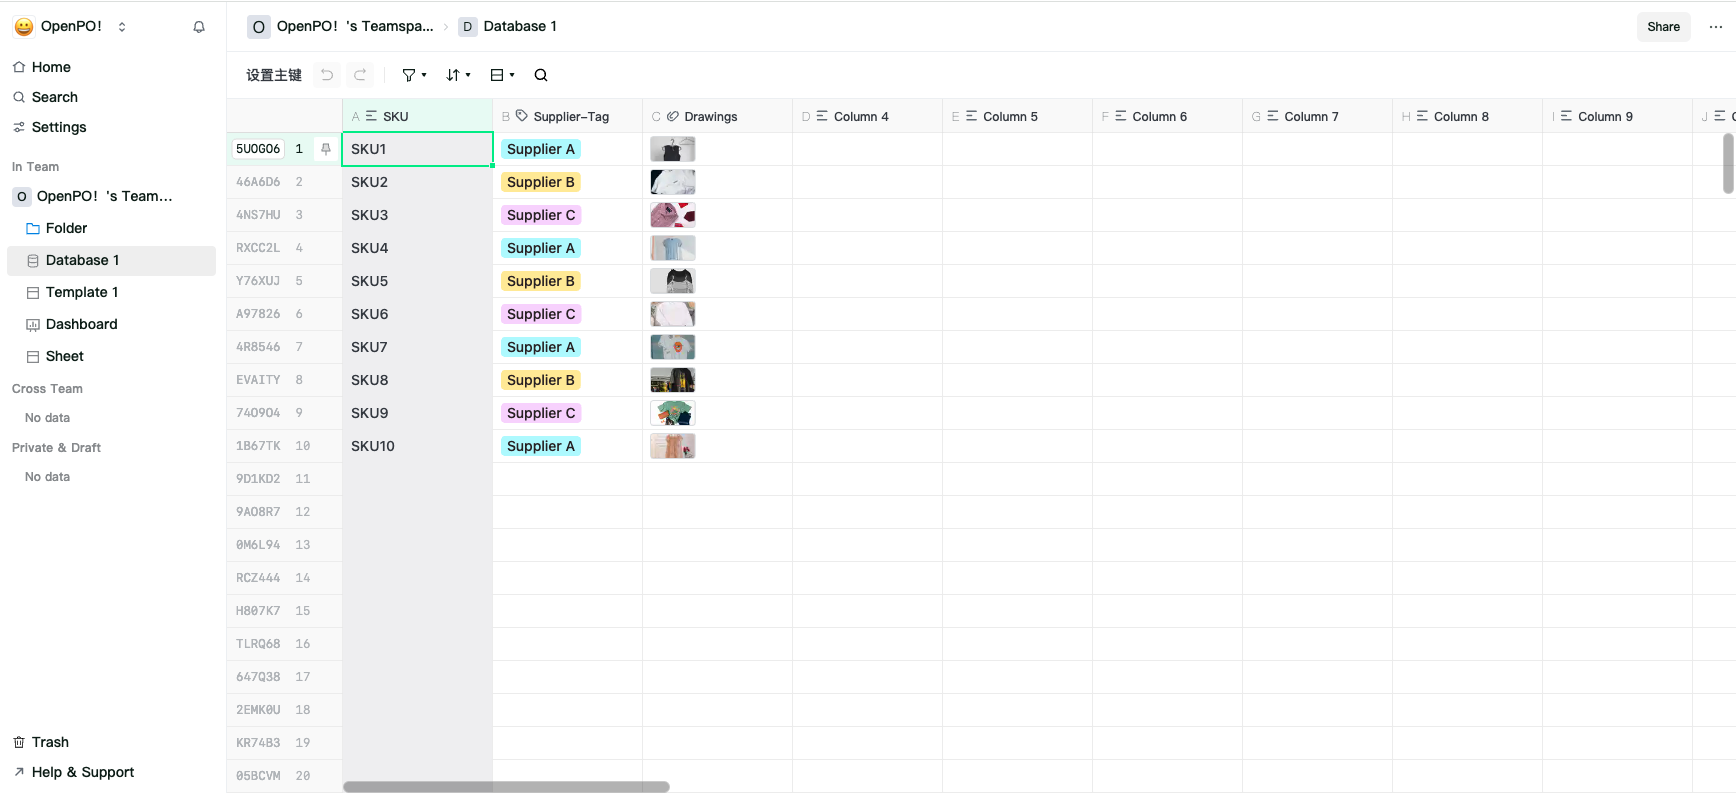
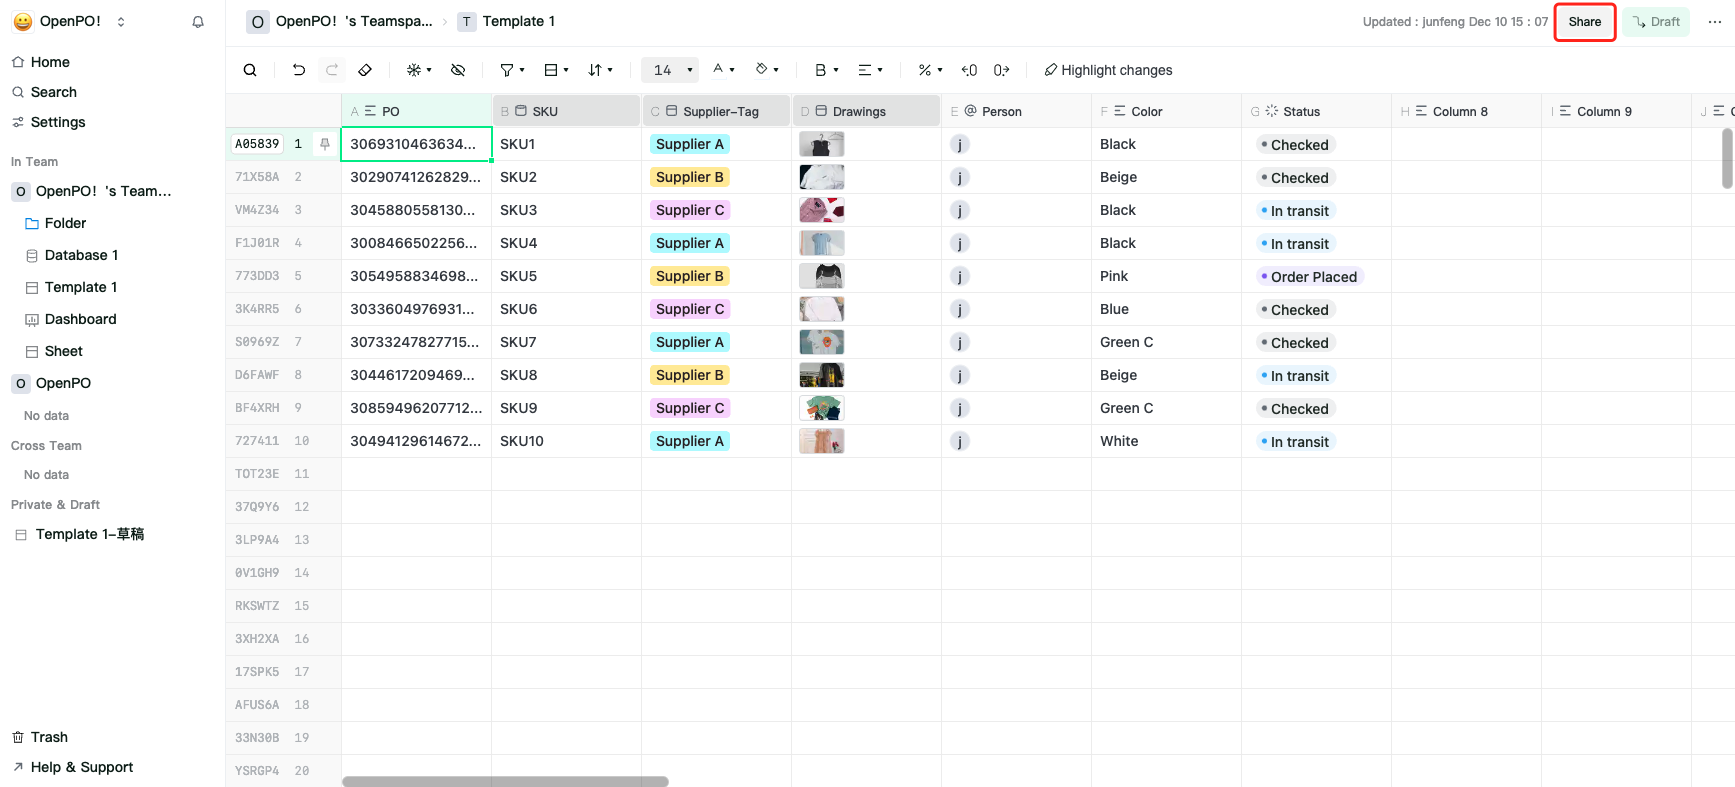
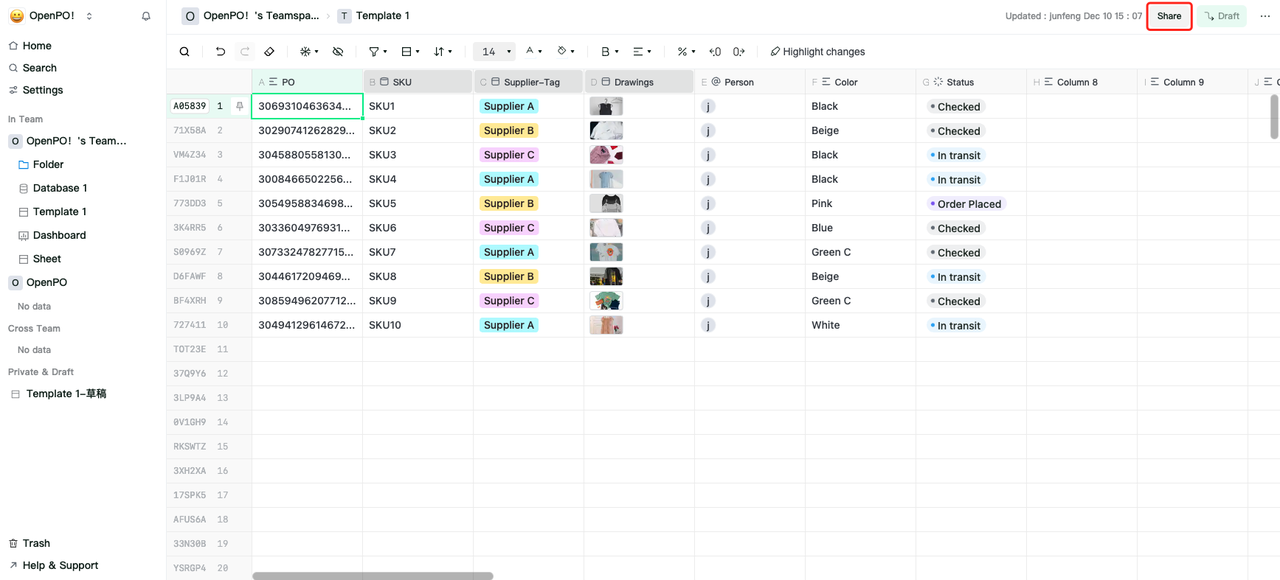
Spreadsheet Overview
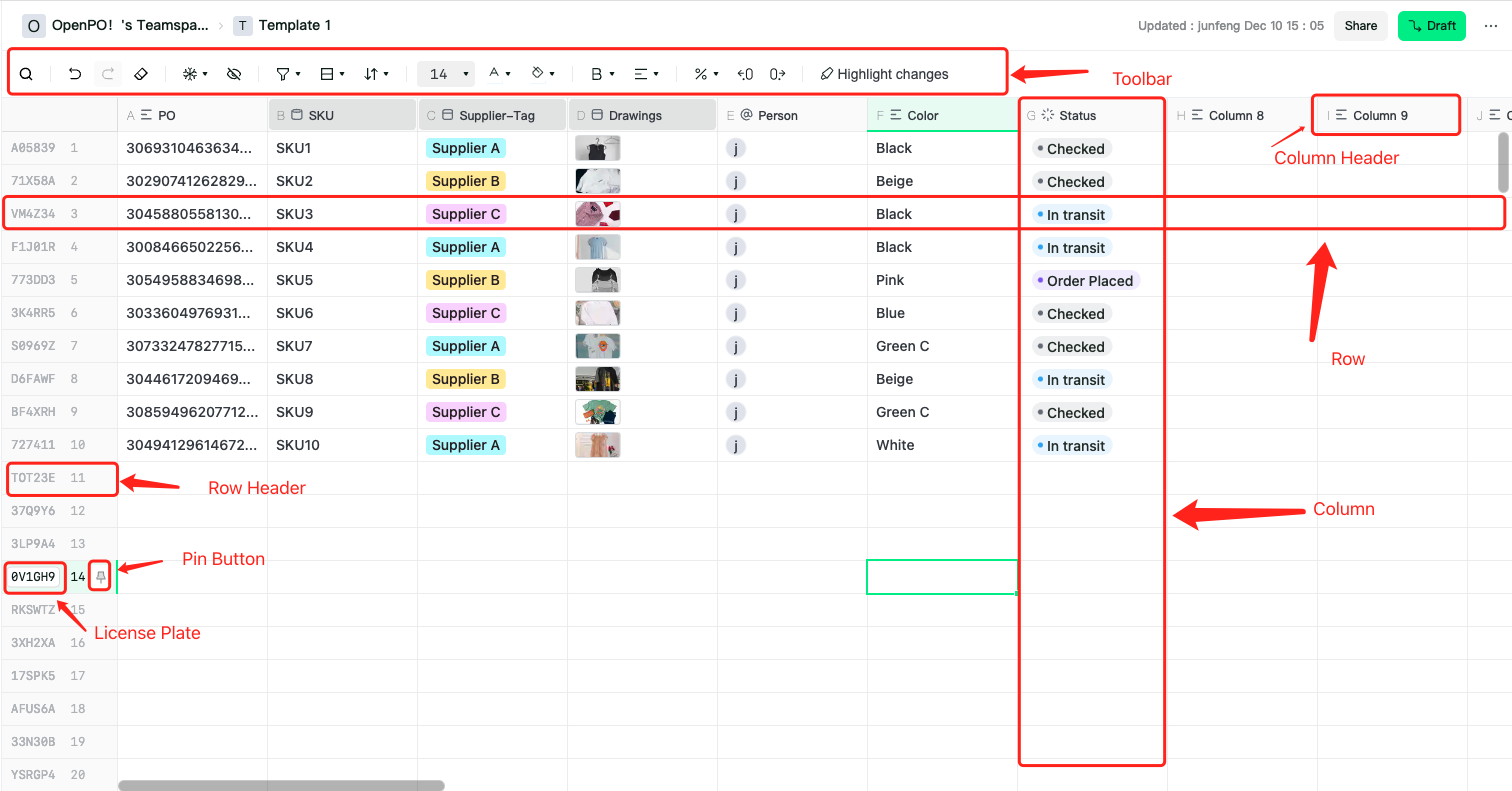
1、License Plate: The ID of each row in the table.
You can search for the license plate of each row to find the row.
2、Pin Button: By clicking the pin button, you can pin/unpin the row to the Focus on the home page.
3、Row: A horizontal sequence of cells in the table, each row represents a data record or entry.
4、Column: A vertical sequence of cells in the table, OpenPO supports switching to multi-dimensional column types for columns.
5、Toolbar: The toolbar is part of the table interface, providing various functions for operating and editing table content.
The toolbar includes:
- Search, undo/redo, clear format
- Freeze, hide columns
- Filter, sort, group
- Font size, text color, background color
- Text style, alignment
- Cell format settings
- Highlight changes
6、Right-click menu: The right-click menu appears when you right-click on the row header, column header, or cell.
Database Overview
In supply chain management, master data plays a crucial role:
1、Data Consistency: Master data ensures the consistency of information throughout the supply chain, such as product, supplier, customer, and location information. This helps reduce data redundancy and errors, improving the accuracy of decision-making.
2、Improve Efficiency: By centrally managing master data, companies can simplify data entry and maintenance processes, reduce operational complexity, and thereby improve overall efficiency.
3、**Enhance Analytical Capabilities:**Master data provides a reliable foundation for data analysis. Accurate master data can support more in-depth business analysis, helping companies identify trends and optimize operations.
4、Improve Communication and Collaboration: Clear and consistent master data across various supply chain segments can promote effective communication and collaboration between different departments, suppliers, and customers.
5、Compliance and Risk Management: Maintaining accurate master data helps companies comply with industry standards and regulations, reducing compliance risks.
Dashboard Overview
Create dashboard type resources, supporting users in configuring a variety of charts in dashboard resources, making complex data information easier to understand and analyze.
OpenPO Reports
Dashboard
Dashboards visually display data through charts, graphics, and gauges, making complex data information easier to understand and analyze.
Summarize key performance indicators and important data on one interface, making it convenient for users to quickly obtain core data of enterprises or projects.
Create/Configure Dashboards
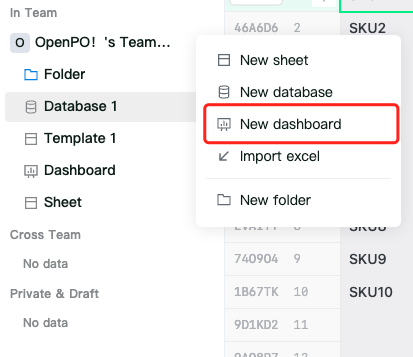
By hovering over the team space/folder and clicking the "+" button, add a dashboard to create a dashboard type resource.
Create Charts
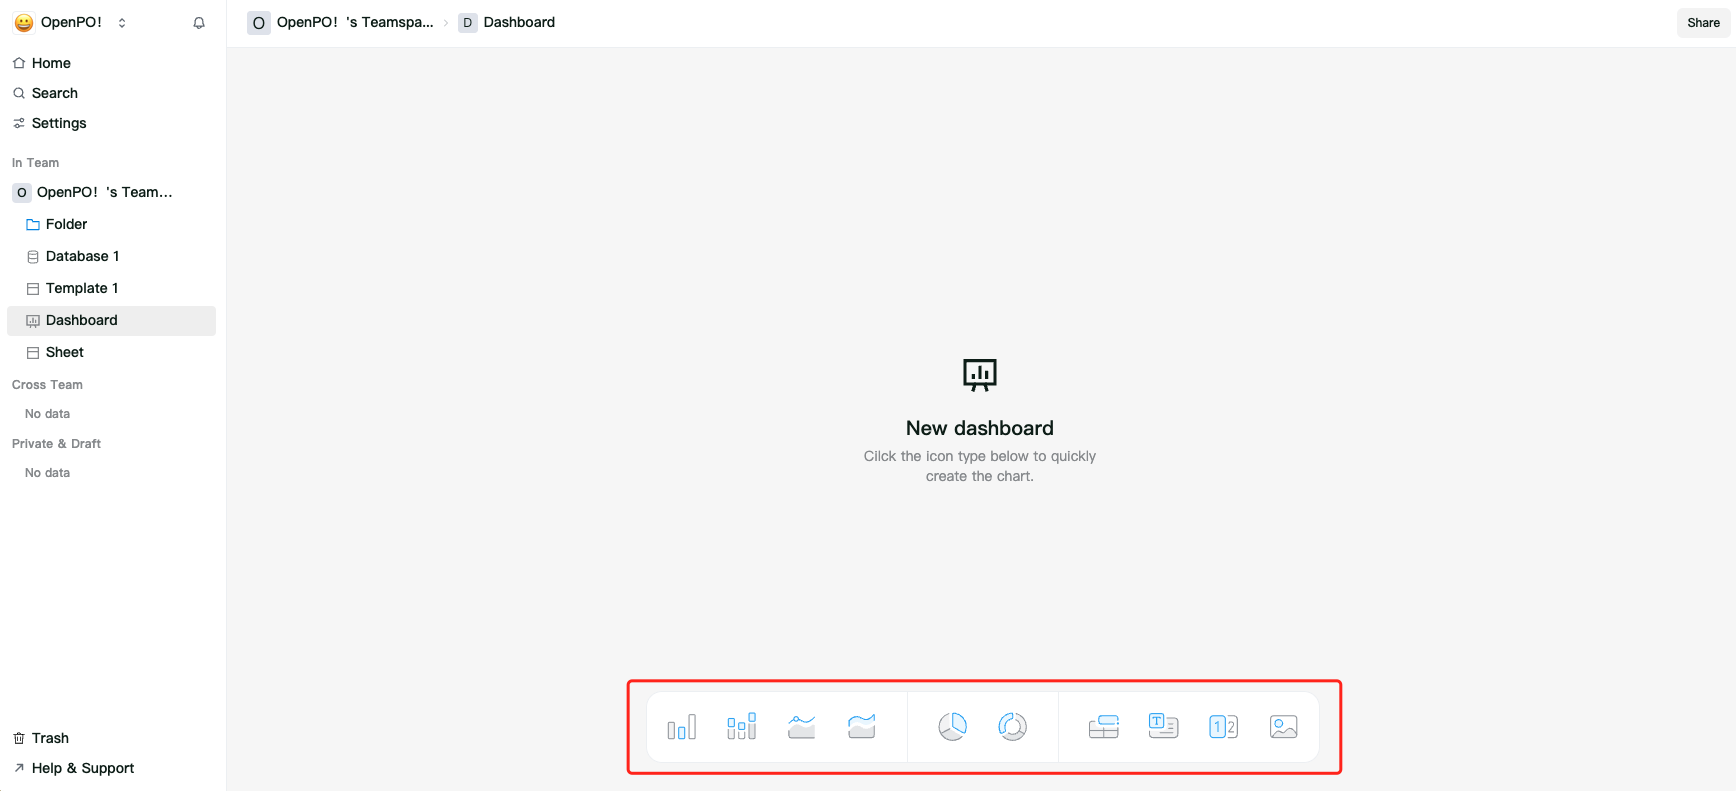
When you enter the dashboard page, you can create cards for the corresponding chart types through the quick bar. Click on the shortcut button to generate the card, and a configuration panel will appear on the right side.
After configuring the options in the right panel, the chart is created.
Supported Chart Types:
Pie charts、Line charts、Bar charts、Donut charts、Stacked line charts、Stacked bar charts、Numbers、Text、Cell content、Images
Deleting Charts
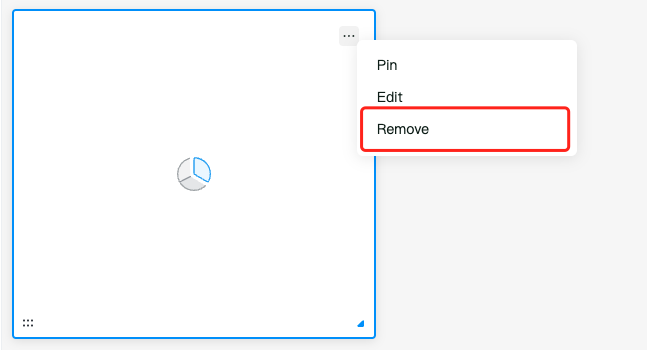
To delete a chart, click the action button in the top right corner of the chart card, and then click the remove option in the drop-down menu.
Sharing Charts
By clicking the share button in the top navigation bar, you can open the share popup. Users with full permissions can invite users who have registered in OpenPo to this dashboard by entering their email addresses.
OpenPO Collaboration
Drafts
Click the draft button in the table navigation bar to generate a draft in the Private area of the sidebar.
Each user can only generate one draft per resource.

After entering the draft editing, once the editing is complete, click the "Submit" button in the navigation bar to submit the draft and merge it into the source file.

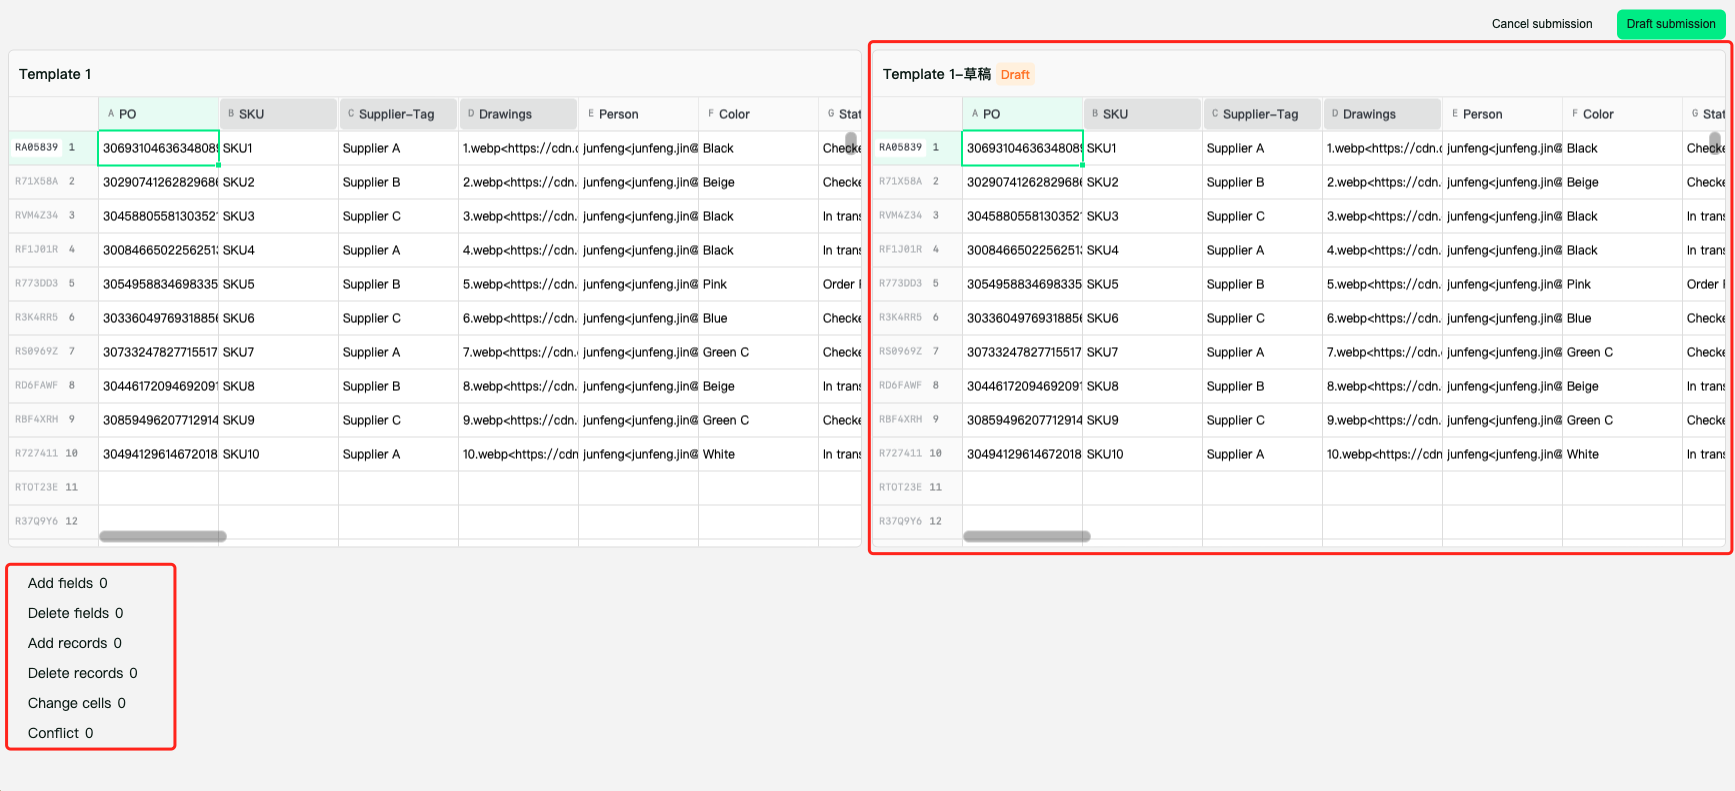
After clicking submit, you will enter the draft submission page.
- The draft submission page highlights the areas that will change in this submission
Including:
Added or removed columns、Added or removed rows、Cell changes、Conflicts
- The bottom left corner of the draft submission page shows how many changes there are between this draft and the source file.
- Click "Cancel Submission" in the top navigation bar to cancel the operation; click "Submit Draft" to merge the draft into the source file.
Highlight Changes

Click the highlight changes button in the table toolbar to pop up the highlight changes configuration box.
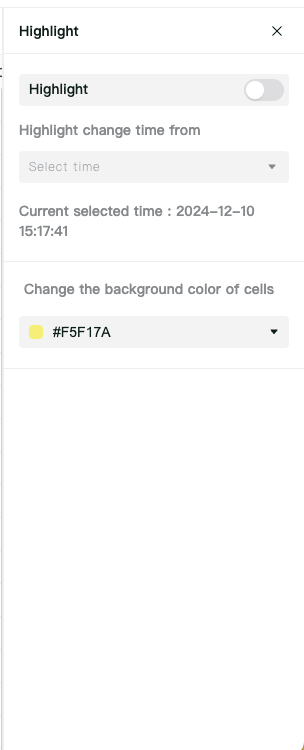
When highlight changes is enabled:
1、Supports configuration of highlighting time: the background color will be changed for any cell that has changed within the selected time range.
2、You can manually configure the background color of highlighted cells.
Permission Logic
OpenPo's permissions are divided into three parts:
- Workspace permissions
- Team space permissions
- Resource permissions
Workspace Permissions
Role Introduction:
Workspace owner: Can manage workspace settings, delete the workspace, and manage other administrators, members, and guests.
Workspace member: Can create and edit resources within the team but cannot modify the permissions of personnel.
Guest: External personnel you wish to collaborate with on specific resources. They can be invited to individual OpenPo resources but not to the entire workspace.
Note:
If a guest has no resource permissions in the current workspace, they cannot access the workspace.
Adding Member
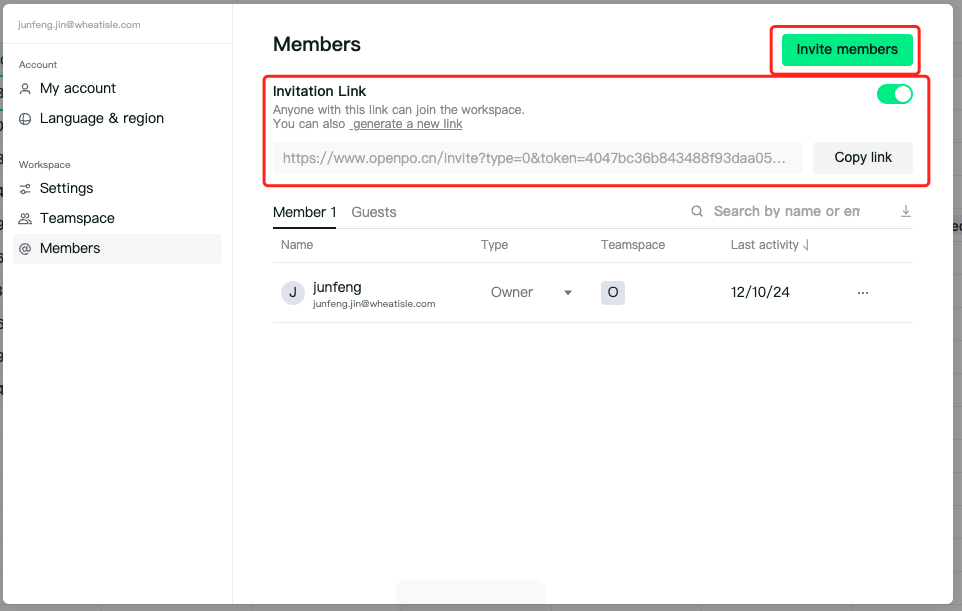
- Join through the invitation link under the Members tab in Workspace Settings.
- Click the invite button under the Members tab in Workspace Settings to invite accounts registered in OPO.
- Upgrade guests to members under the Members tab in Workspace Settings.
Note:
Only the Workspace Owner can perform the above settings.
- Use the invite button in Teamspace Settings to invite accounts registered in OPO.
Note:
Can be operated when you are both the Workspace Owner and the Team Space Owner.
Teamspace Permissions
Teamspace Introduction
- Use team spaces to manage resources.
In OpenPo, teamspaces are used to manage a team's resources.
- Teamspace Permission Settings
In the teamspace settings, the team space owner can adjust permissions, choose whether the teamspace is open, closed, or private, and set the access levels for teamspace owners, members, and others.
- Joining or Leaving Teamspaces
- Join an open teamspace: Directly select and join from the team space list.
- Join a closed teamspace: Closed team spaces will display a lock symbol, and you need to contact existing teamspace members to invite you to join.
- Leave a teamspace: Hover over the team space name, click the '•••' button, and then select 'Leave Teamspace' option.
- Browse teamspaces: Click 'Browse All Team Spaces' in the left sidebar, and you will see the list of teamspaces you belong to, including open and closed team spaces.
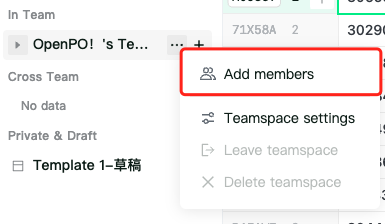
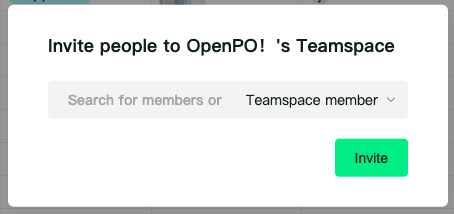
- Invite to join a teamspace: The team space owner hovers over the teamspace name, clicks the '•••' button, and then selects the 'Add Members' option to invite collaborators to the team space by entering their email addresses.
- Creating a Teamspace
Click '+' under the 'Teamspaces' tab to create a new teamspace.
Teamspace Types
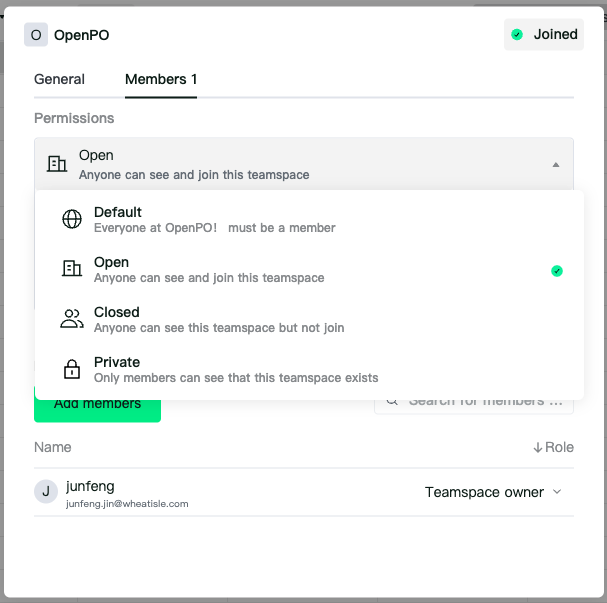
- Default
- Members of the workspace are automatically added to the default type of space,and there is at least one Default type.
- Resources created in the default space can be searched and accessed by every member of the workspace.
- Open
- All members of the workspace can see and join without applying.
- Closed
- All members of the workspace can see it, but they need to apply to join.
- Private
- Only the creator and members invited can see the teamspace.
Teamspace Roles
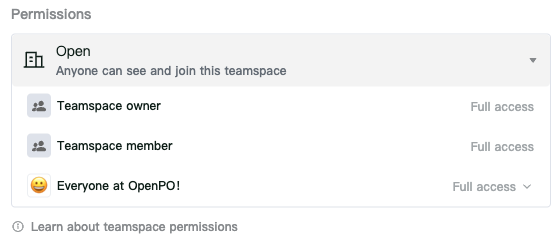
There are three roles for teamspaces:
- Teamspace Owner: Has management permissions for the teamspace and can change the type of team space, as well as the permissions of teamspace members and other people in the workspace within this teamspace.
- Teamspace Member: Members who have joined the teamspace.
- Everyone in workspace :Users in the current workspace.
When modifying permissions in the teamspace settings:
1、The permissions of the team space owner are always management permissions and cannot be modified.
2、The permissions of team space members are always higher than those of others in the workspace.
3、For private type team spaces, it is not possible to change the permissions of others in the workspace.
Resource Permissions
Default Permissions:
When creating a new resource, the permissions of the resource inherit the permissions of the teamspace/folder it is in.
For example:
If the teamspace settings are:
- Teamspace Owner permissions: Full access
- Teamspace Member permissions: Can edit
- Everyone in workspace: Can edit
When creating a resource in that teamspace, the resource will have the same permissions.
Modifying Permissions:
Click the share resource button in the top navigation bar of the resource to display the permission list for that resource. Users with full permissions can modify resource permissions.
Different permissions introduced:
- Full access :Can edit and share with others.
- Only full access support operations such as moving, deleting, and renaming resources.
- Can edit:Can edit but cannot share with others.
- Can comment : Can view and comment but cannot edit.
- Can view :Cannot edit or share with others.
- No access
Permissions that different roles can modify:
| Three Areas of Permissions | Role | Types of Permissions |
|---|---|---|
| Teamspace Member Permissions | - Teamspace owner | 1、Full access |
| - Teamspace members | 2、Can edit | |
| 3、Can comment | ||
| 4、Can view | ||
| 5、No access | ||
| Workspace Member Permissions | - Everyone in Workspace | 1、Full access |
| 2、Can edit | ||
| 3、Can comment | ||
| 4、Can view | ||
| 5、Remove | ||
| Individual User Permissions | - Workspace Member | 1、Full access |
| - Guest | 2、Can edit | |
| 3、Can comment | ||
| 4、Can view | ||
| 5、Remove |
Permission Inheritance:
Inheritance:
- When a resource is created in a teamspace, it inherits the permission relationship set in the teamspace by default.
- When a resource is created under a folder, the resource inherits the folder's permission relationship by default.
- When the permissions of the upper level are updated, the resource permissions are updated simultaneously.
For example:
The permissions for Folder A are:
Inherited part
Teamspace Owner: Full access
Teamspace Members: Can edit
Independently configured permissions
User A: Full permissions.
At this time, when creating a resource under Folder A
The permissions for the resource are:
Inherited part
Teamspace Owner: Full access
Teamspace Members: Can edit
User A: Full permissions.
- Breaking Inheritance
After modifying the permissions of the teamspace owner, teamspace members, or User A, the inheritance relationship is broken.
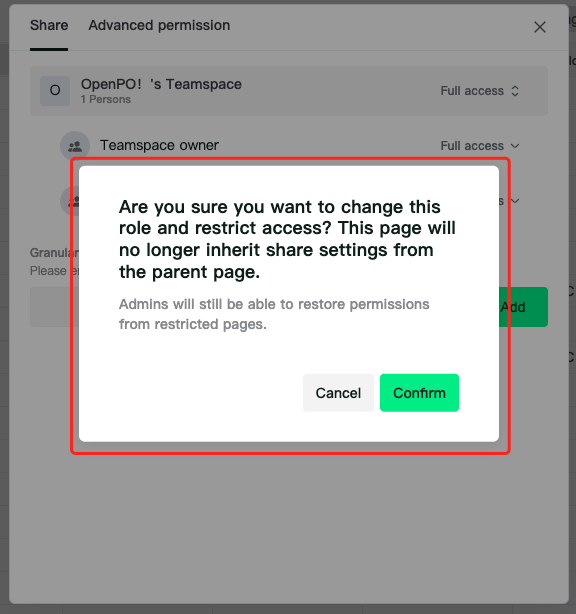
After confirming the detachment from the inherited permissions, the resource permissions are independently configured and are independent of the Teamspace permissions, and changes to the settings do not affect each other.
Changes to the permissions of any role in the teamspace will not affect the permissions of the resource.
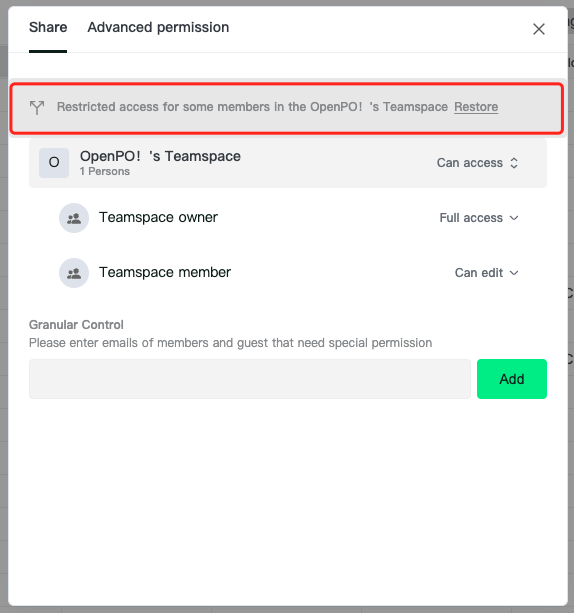
- Inherit Permission Recovery:When a file that has broken inheritance needs to inherit the permissions of the upper level again, click [Restore] in the popup window to restore inheritance.
- After restoring inheritance, the permissions of the current resource (folder, sheet, database, dashboard) are based on the permissions of the upper level at this time, and subsequent changes to the parent level permissions will still affect the inherited resource permissions.
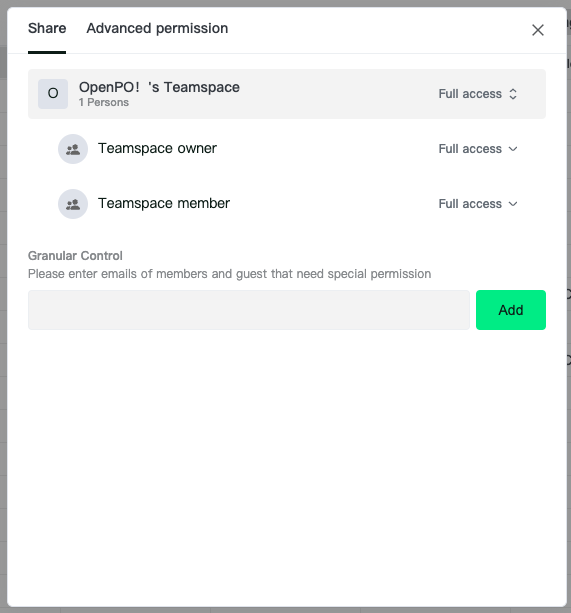
Resource Sharing
Click the share button in the top navigation bar, and in the resource sharing popup that appears, users with management permissions can invite users to this resource by entering their email addresses.
1、Support for batch invitations: Multiple email addresses are separated by 'comma or enter'.
2、If the entered email address is not a user in the current workspace, they will join the resource and workspace as a guest.
Row and Column Permissions
Different user roles require different data access permissions to reflect their responsibilities and duties within the organization. Therefore, we need to implement permission control focused on each cell through row and column permissions, limiting users to access only relevant data, reducing information overload, and improving work efficiency.
The essence of row and column permissions is to restrict users withcan editpermissions.
If a user's permissions are lower than editable permissions, they still cannot edit the corresponding content after row and column permissions are set.
Row Permissions
Row Permissions Entry
Click the share button in the top navigation bar of the table resource, and in the pop-up window, go to the Advanced Permissions tab.
Note: Only users with management permissions can edit advanced permissions.
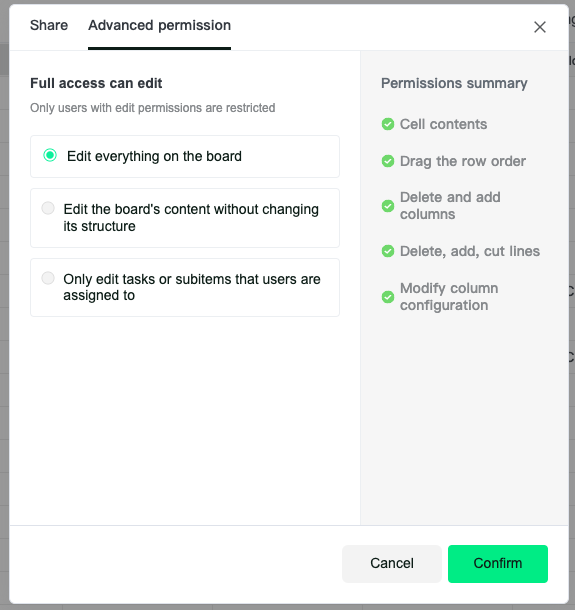
Advanced permissions are divided into three options:
1、Edit everything on the board
2、Edit the board's content without changing its structure
3、Only edit tasks or subitems that users are assigned to
When using this option, there must be a member column in the current table, and the selected member in the cell can edit the content of that row.
Note:
1、If the user's permissions are lower than editable permissions, they still cannot edit the row content.
2、When multiple member columns are selected, the editable users for that row are taken as an intersection.
Specific Restrictions on Row Permissions
| Row Permission Control Options | Restrictions for Users with Edit Permissions | Restrictions for Users with full access |
|---|---|---|
| Edit everything on the board | Unlimited | Unlimited |
| Edit the board's content without changing its structure | Rows: Cannot add or delete rows. | Unlimited |
| Columns: Cannot add or remove columns, or change configurations. | ||
| Dragging: Can drag to reorder rows and columns. | ||
| Only edit tasks or subitems that users are assigned to | OpenPO: | Deleting member columns that are used for permissions is not allowed. |
| - At least one 'Member Column' must be selected. | Rows: No addition or deletion allowed. | Modifying the column type of member columns used for permissions is not allowed. |
| - Multiple selected 'Member Columns' will be treated as a union. | Columns: No creation or removal allowed, and no configuration changes permitted. |
Column Permissions
Column Permissions Entry
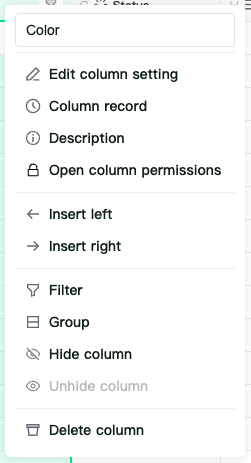
Right-click on the column header, and select the "Enable Column Permissions" option from the right-click menu.
You can click "Enable Column Permissions" to open the column permissions settings popup.
Disabling Column Permissions
When column permissions are enabled, right-click on the column header, and the "Disable Column Permissions" option will appear in the right-click menu. Click it to disable the column's permissions.
Note:
Only users with management permissions can enable/disable column permissions.
When column permissions are enabled, a "🔒" icon will appear when you hover over the column header.Clicking the "🔒" icon on the column header will also open the column permissions settings popup.
Column Permissions Settings Popup
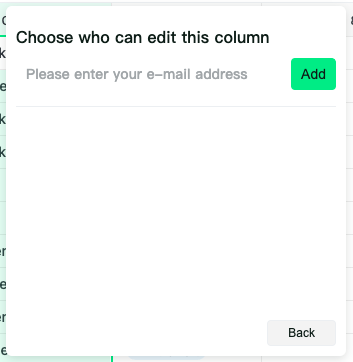
Users with full access can add users to the column permissions list by entering their email addresses.
Note:
Once column permissions are enabled, only users added to the column permissions list who have edit permissions for the table and users with full access can edit the content of that column.
You can remove the user's permissions in the current column by clicking the "x" button next to the member.